
How to Build Trad Anchors With The Rope
When climbing traditionally protected routes it is common practice to tie into your gear using the rope when building an anchor either at the top of the pitch or the top of a route.
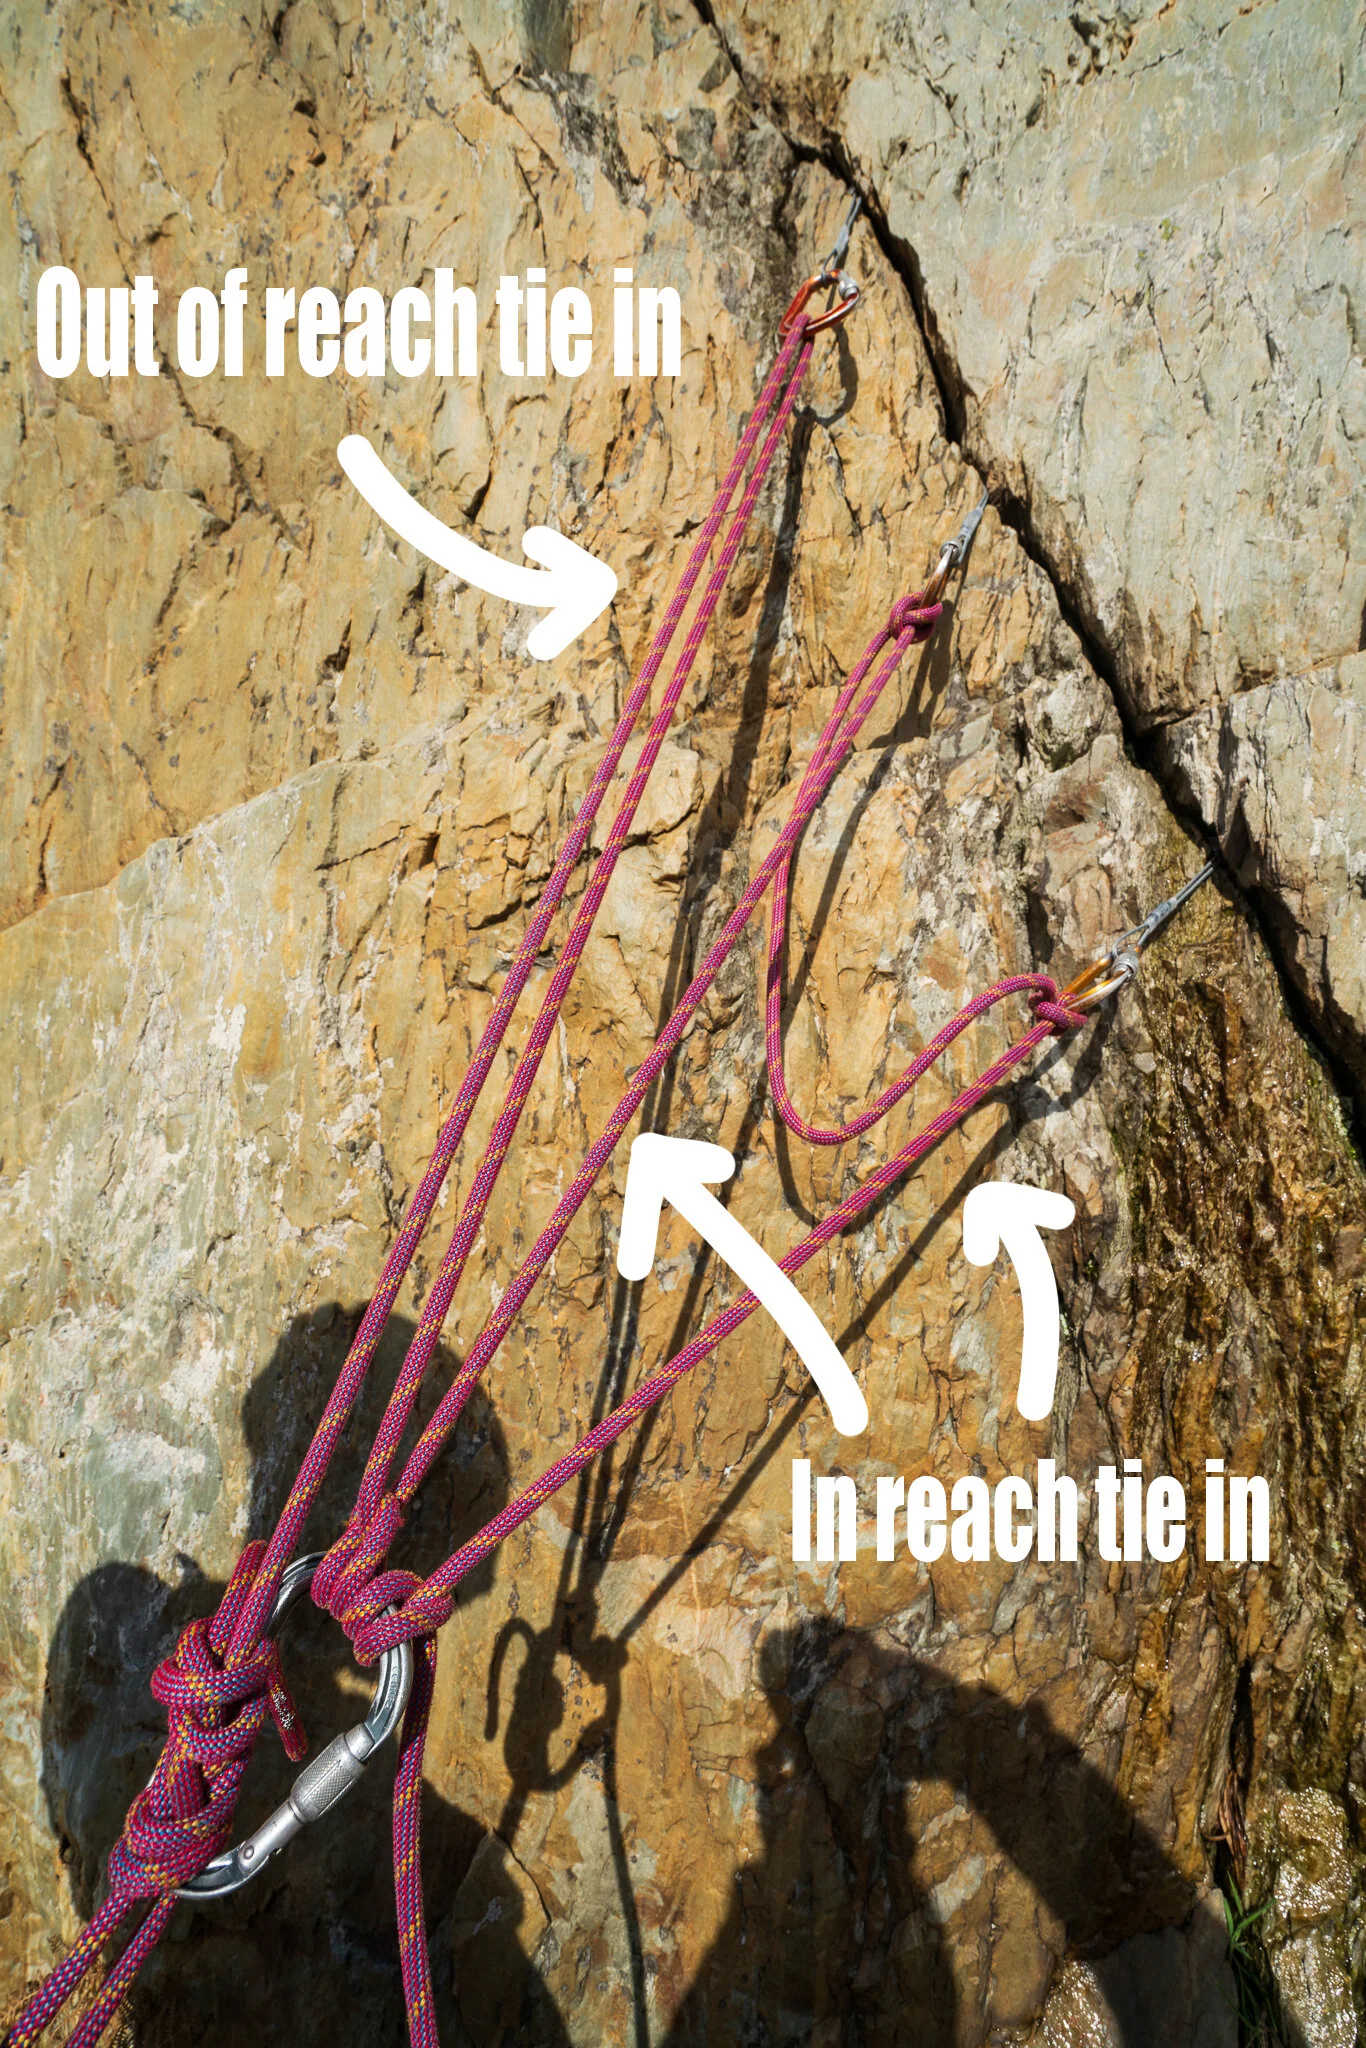
This article aims to explain the two main methods for attaching to gear, firstly where you can reach the gear you are tying into, and secondly where it is out of reach.
Some people find this idea confusing but it really is simple. Can you reach the piece of gear from where you want to belay without moving? If yes, then it’s in reach! If not, then it’s out of reach.
It is important you can always reach the clove hitch you are attached to the gear with in order to easily adjust the hitch and equalise the anchor.
As with all written climbing instruction, it can only go so far, so practice these techniques safely at ground level first! If you are in any doubt, why not book a days instruction to learn these anchor methods first hand, refresh what you already know, or have a climbing ‘MOT’.
For clarity in the photos, the climber hasn’t put the belayer on belay yet, so no belay plates are shown. The photos just show the construction of the belay using the rope.
Single Point Anchors
In Reach
The first and most simple of the anchor tie ins is where you have a single point anchor. Your anchor could be a massive spike or rock, a huge oak tree, a pair of bolts connected by a chain, or a gear anchor you have built and equalised yourself using wires, cams and slings. The photos here all show a sling which has equalised three pieces of gear, but the process is the same regardless of your anchor type. All that is required is one central point to tie the rope to.
To tie to a single point, in reach, anchor, clip a locking carabiner to the master point, take the rope tied to your harness and tie a clove hitch into the carabiner you just placed.
Once you’ve tied the clove hitch it can be adjusted until the rope connecting you to the anchor is tight.

Tying into single point, in reach, anchor.
Out of Reach
Sometimes it’s not possible to connect yourself using the in reach anchor method. Your single point anchor might be far from the edge of the cliff eg. a huge boulder or tree several meters away from the top of the climb. It’s always preferable to be able to see your second as they climb, so using the out of reach method allows you to tie to the anchor and move closer to the edge to belay.
On a multipitch climb it’s often good to sit down and belay. By using the out of reach method you can use a high anchor, perhaps three equalised pieces of gear, or a huge spike of rock, and then sit down (out of reach of the anchor) and adjust the rope until tight.
The out of reach anchor method is formed by:
Clipping your rope through a screw gate carabiner on the master point of the anchor and bringing the rope back to yourself.
Tying a clove hitch on a second carabiner clipped to the loop of rope formed by your tie-in figure of eight knot. You can then adjust this clove hitch to get your loop of rope tight.

Tying into a single point out of reach anchor.
Two Point Anchors
In Reach
Tying into multiple pieces of gear is a great way to quickly build an equalised anchor. Equalisation is where the weight of a climber or the force from a falling climber is spread between two or more pieces of gear.
If building an anchor with only two pieces of gear, they must be unquestionably strong. I would typically use this two piece method if I was equalising two bolts, or two good trees etc.
The process starts the same as tying into an in reach, single point anchor, as described before.
Attach yourself to the furthest away piece of gear first and adjust so that its tight when you’re in the belay position.
Clove hitch into a second piece of gear creating a slack loop of rope. This slack loop is somewhat disconcerting. However, it doesn’t serve any purpose other than being part of the rope so don’t worry that it’s loose.
The tail of this second clove hitch is then clove hitched into the tie-in loop creating two separate strands. Adjust as necessary to equalise the two strands equally.
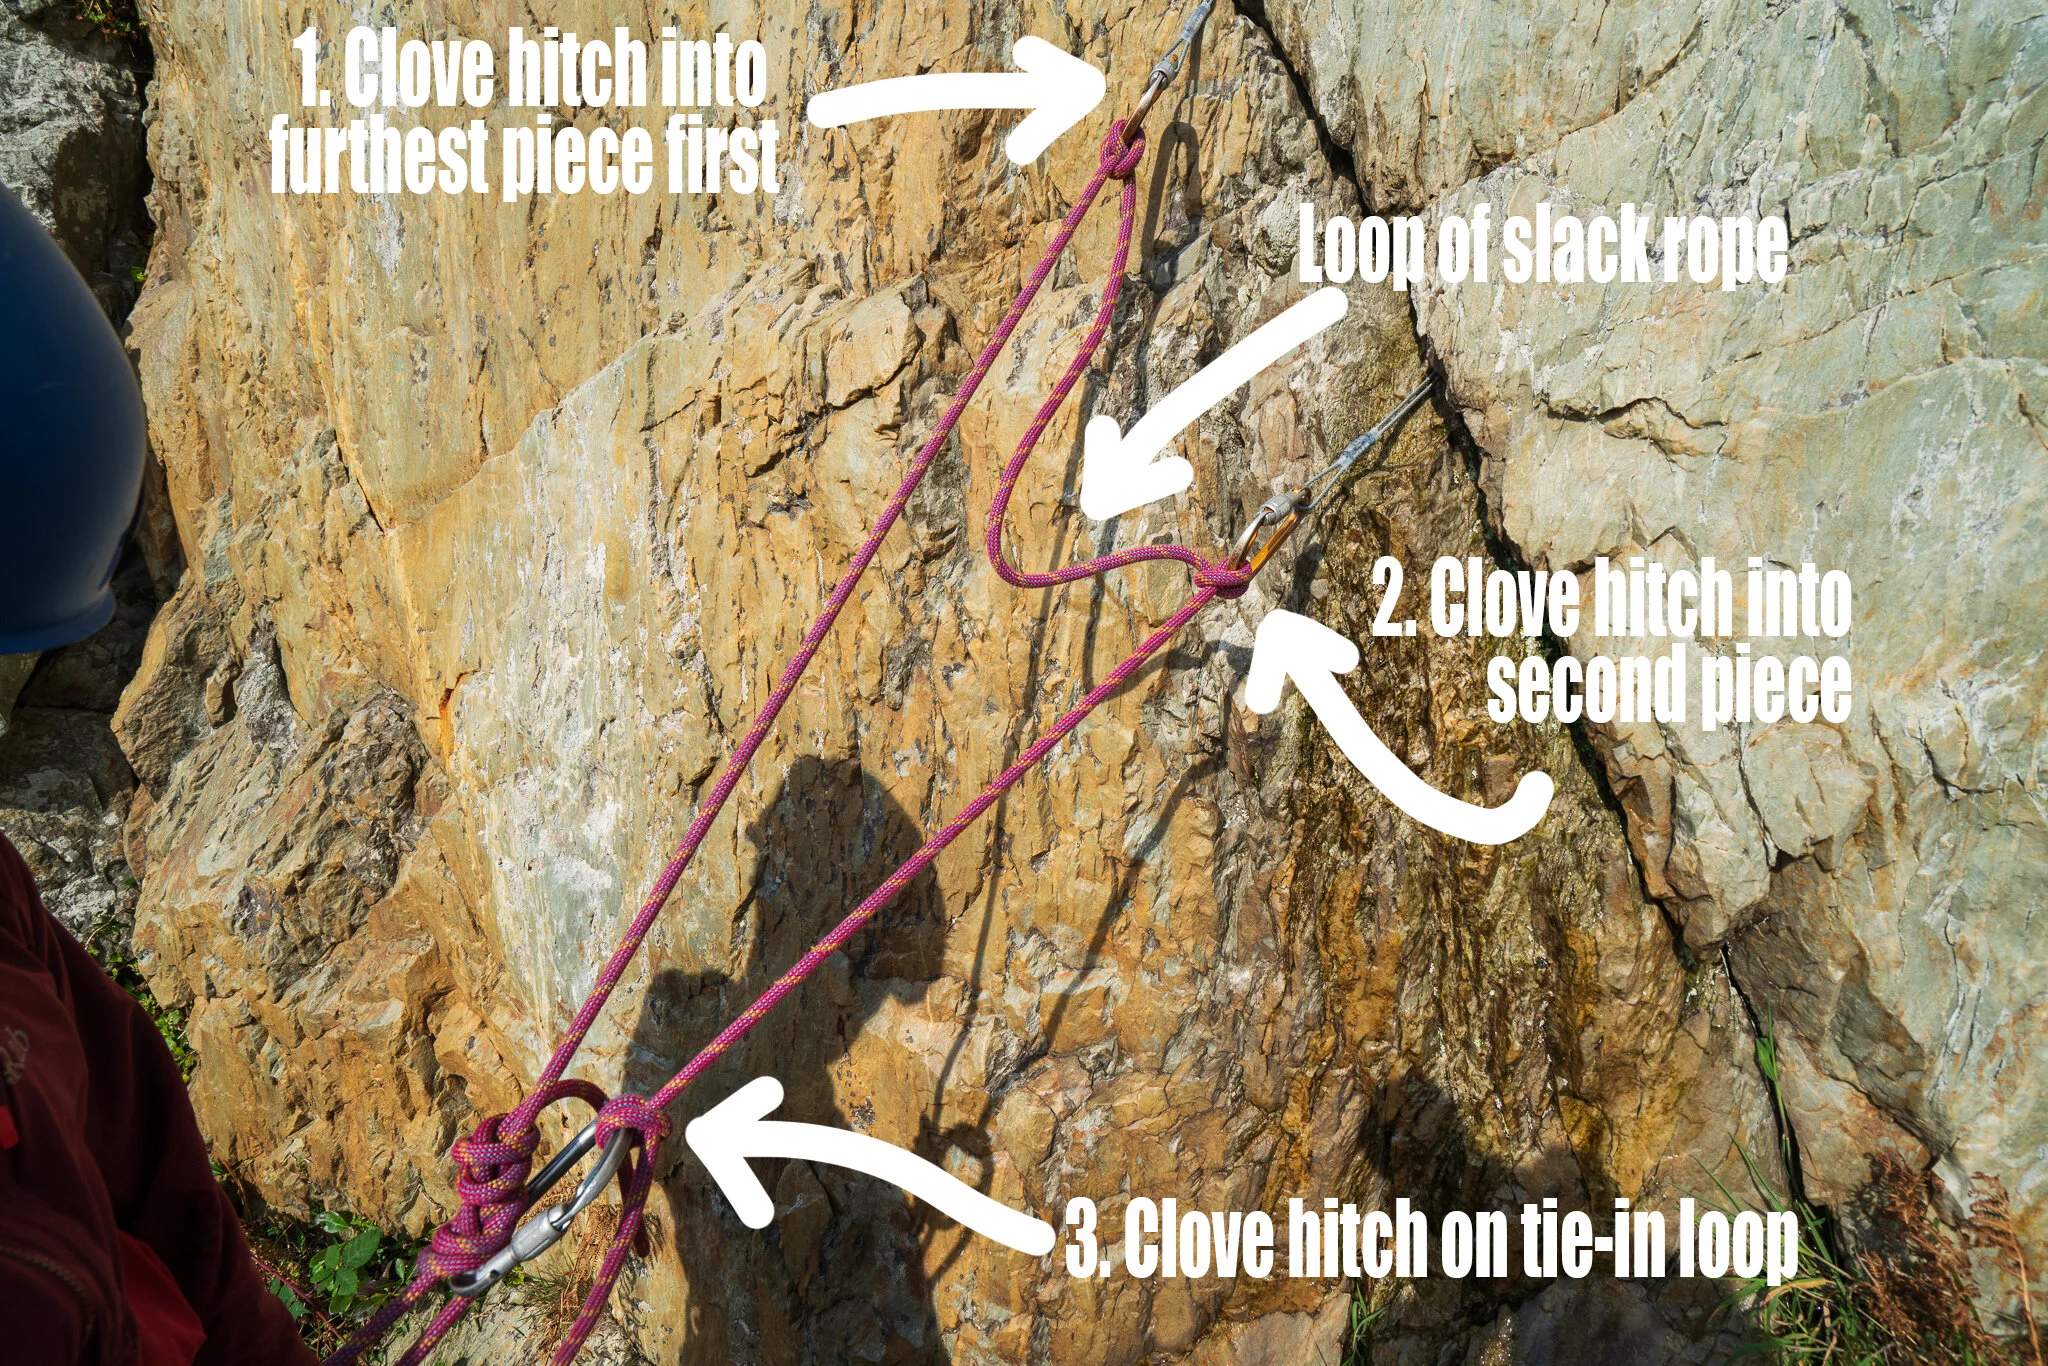
Two pieces of gear, in reach.
Out of Reach
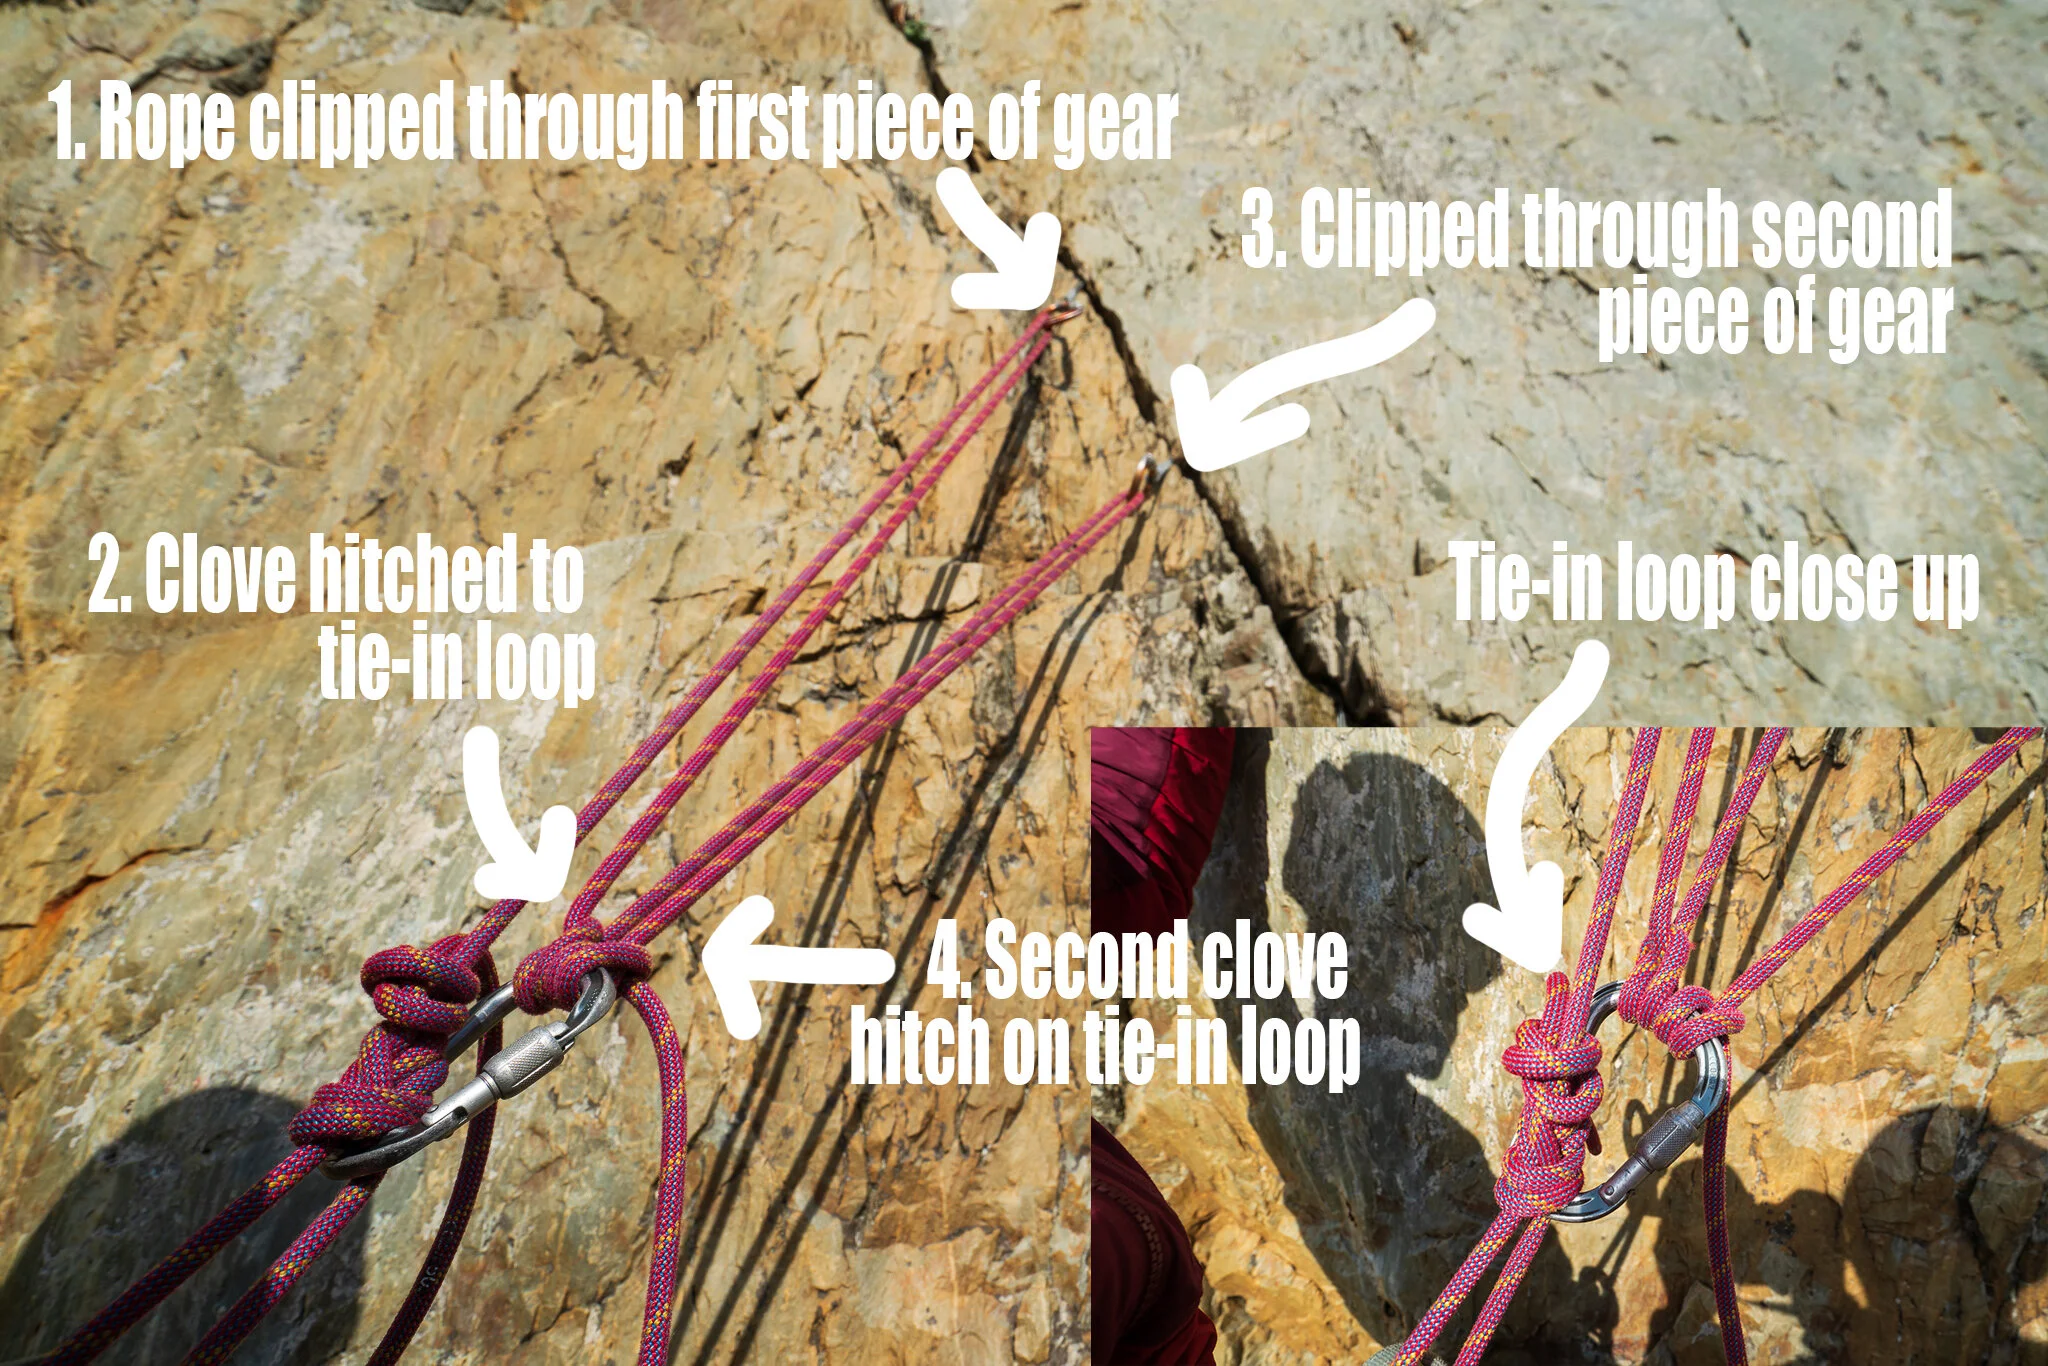
Attaching to two pieces of gear, out of reach, builds on the previous methods.
The rope from your tie-in knot is clipped through the first piece of gear
This rope is then attached to a screw gate on the tie-in loop using a clove hitch
The second piece of gear is clipped
The rope is then attached back to the same carabiner using a second clove hitch. This creates two separate loops of rope which can then be adjusted via the clove hitches until the two loops are equally tight and the anchor is equalised.
Three Point Anchors
In Reach
Once a two point, in reach, system has been built, adding a third piece is simple. The dead end of the rope from the clove hitch which is already attached to the tie-in loop, is simply clove hitched into the third piece of gear.
Clove hitch to furthest piece of gear
Clove hitch to second piece of gear, leaving a small loop of slack rope
Clove hitch to carabiner on tie-in loop
Clove hitch to third piece of gear
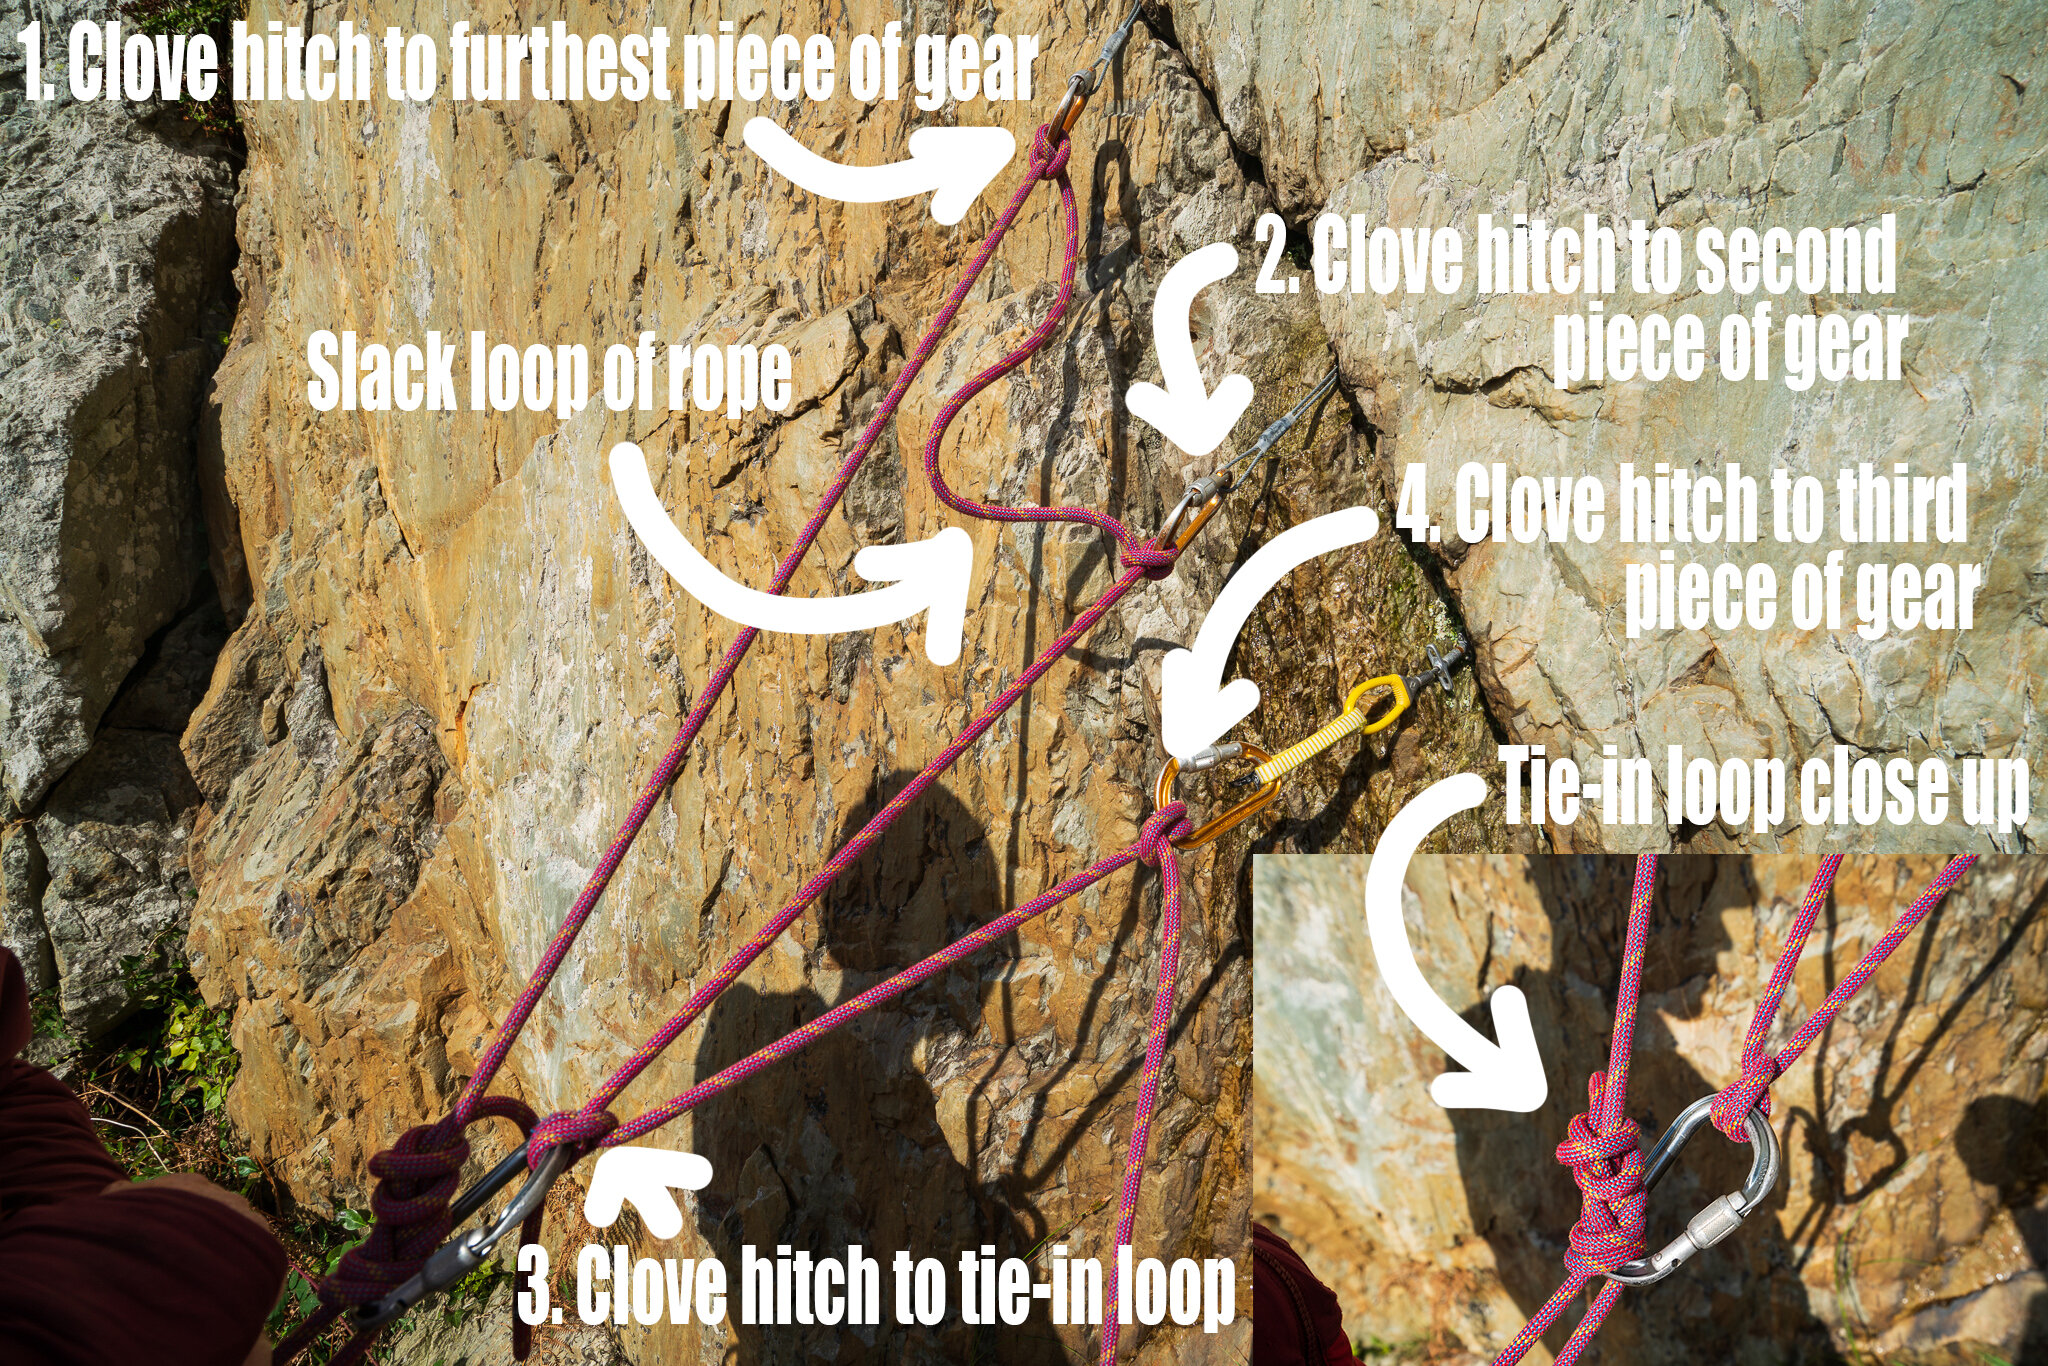
Three pieces of gear, in reach.
Out of reach
Tying into three pieces of gear using the out of reach method is a very common anchor building method. Visit to any British trad crag and you're more than likely to see someone building an anchor like this.
Here, the rope is clipped to each piece of gear and clove hitched back into the tie-in rope loop, creating three isolated rope loops which can be adjusted and equalised from the clove hitches.

Three pieces of gear, out of reach.
Sometimes it’s difficult to fit three clove hitches on a single carabiner. The large pear shaped carabiners such as the Petzl William or DMM Boas usually manage three clove hitches with skinny ropes, but if you struggle to fit them all on a single carabiner, you can just use a second screw gate for the final clove hitch.

Using an additional screw gate to fit three clove hitches.
What Next?
The key concept to understand here is how to tie independent strands and loops of rope using both the in and out of reach methods. Once you can tie these anchors, why not experiment with adding as many pieces as you like! You can mix and match the methods too. Decide on in or out of reach for each piece of gear and try tying in accordingly.
One piece tied into out of reach, two pieces tied in reach.
Here are a couple of real life rope built belays. Firstly summer climbing on Gogarth’s Red Wall. With rock the consistency of wheatabix and sandcastles, I had to place loads of gear to hopefully get a strong belay. Secondly winter climbing in Scotland. This was a hideously snowy day, I had run out of gear at the top of a hard 50m pitch, and had to make do with whatever was left on my harness!
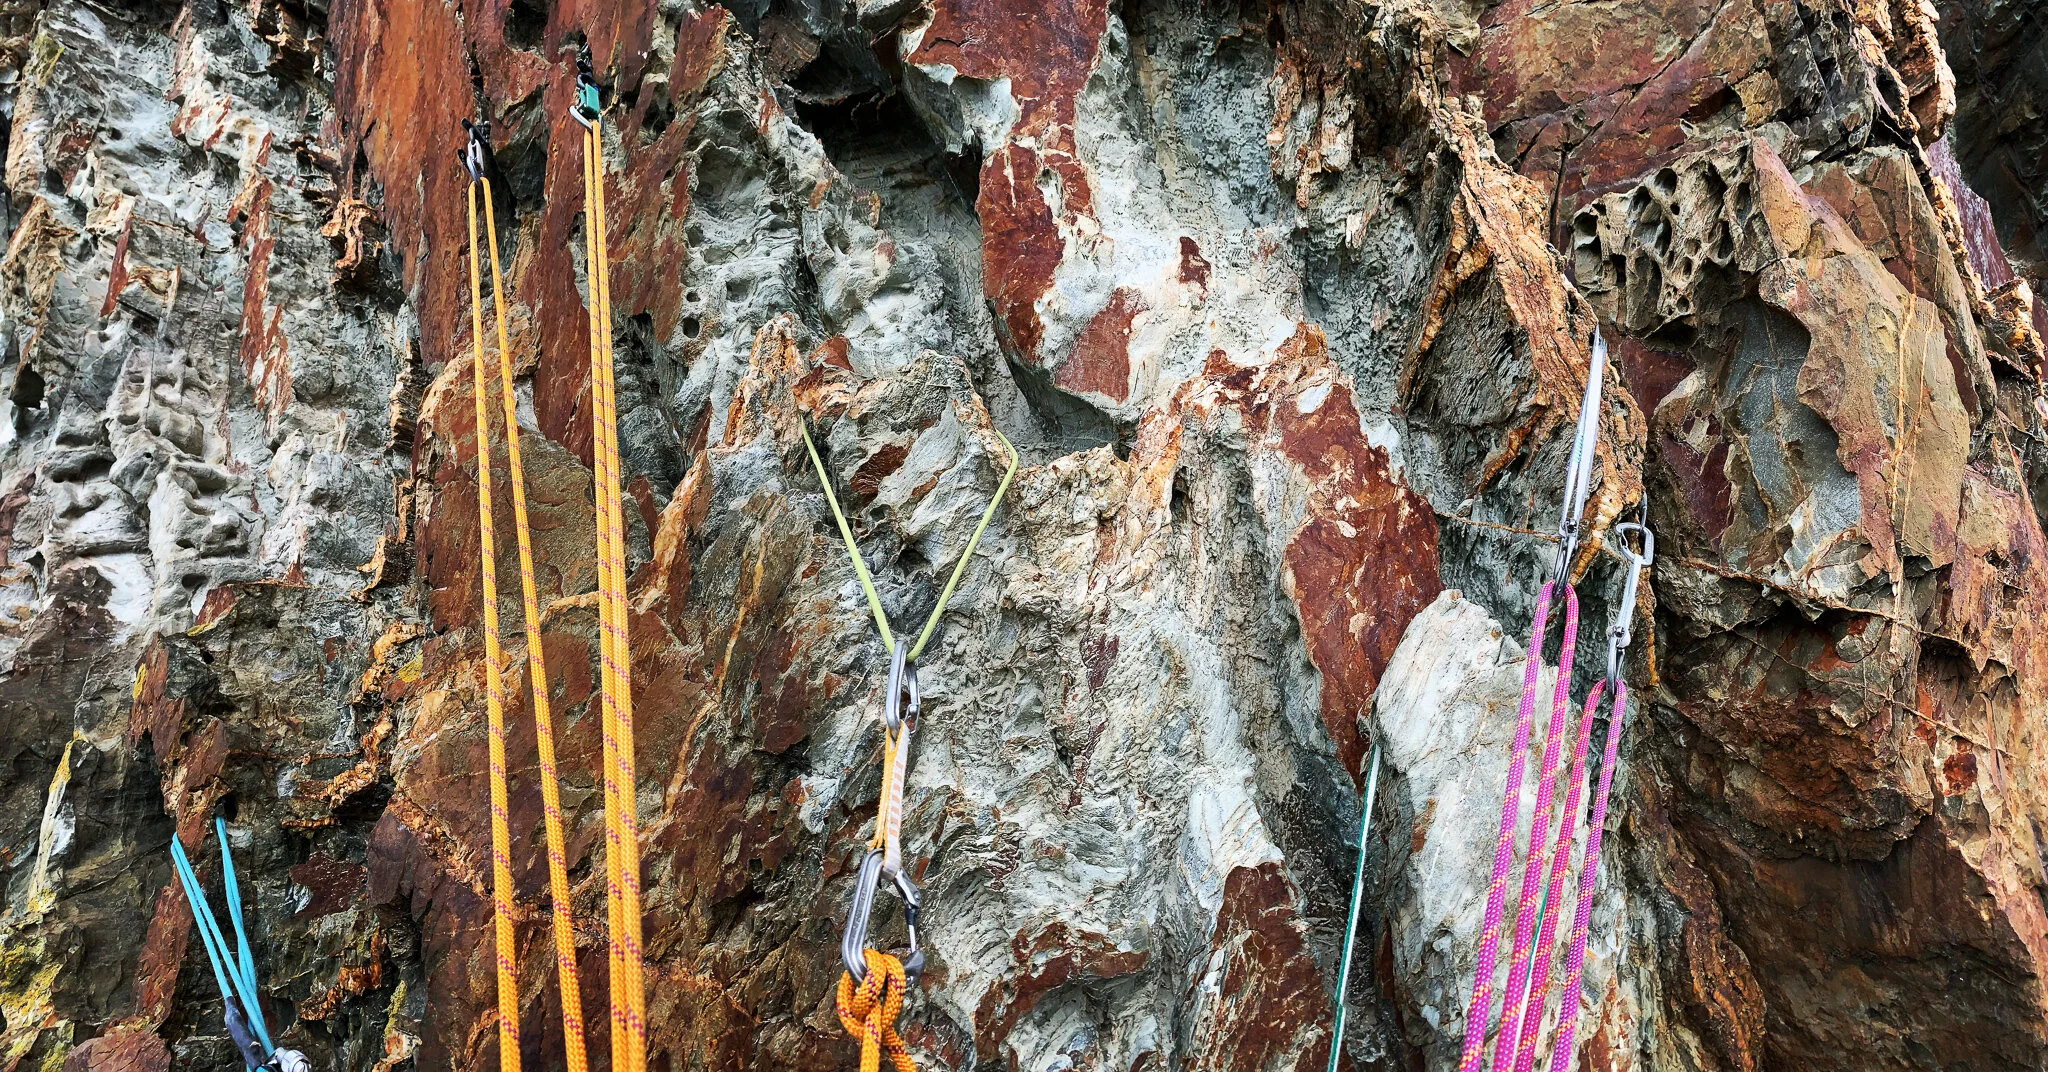
A Red Wall belay…. 7 pieces of gear equalised using both the in and out of reach methods.

Another 7 piece belay, this time in Scotland whilst mixed climbing. Oddly colour coordinated rope and carabiners through absolute chance.
Want To See More?
Head over to Instagram and follow me @lucajcelano for more tips and tricks.
Not Sure What You're Doing?
Feel like you need some help with your climbing? Why not book onto a Learn to Lead or Self Rescue course and get some professional input on your anchor building, learn some new skills and take your climbing ropework to the next level.